
Showing posts with label Project Schumacher. Show all posts
Showing posts with label Project Schumacher. Show all posts
Project Schumacher
Welcome, this is Project Schumacher by Daniel Bahamon. In this blog I will track all the research I will do on developing a racing game engine, I will try to analyze all different types of games like Mario Kart, Need for Speed, Spy Hunter and many others.
Documentation
After finishing the project, I created this document that explains exactly what I went through during the project, I have some of the problems I had and the solutions to them. Also don't forget to check the last page, where I thank everyone that helped me during the project.
Project Schumacher Document
Project Schumacher Document
Conclusions
I can honestly say that this was a very fun project to work on, I discovered a lot of things I could do that before I couldn't even start thinking on how to implement. Unfortunately this is a never ending project, I could stay adding new features and polishing current ones for many years, therefore I can't say I finished it. But I did accomplish all of my original goals plus some other cool extras that I added.
It is sad to admit, but even though this project might not be over, I know that I have to continue with other projects that I have in mind, probably I will never look back at the code of the project, but at least I will have this blog to look back at.
here is the Final Intro Screen of the Project:

It is sad to admit, but even though this project might not be over, I know that I have to continue with other projects that I have in mind, probably I will never look back at the code of the project, but at least I will have this blog to look back at.
here is the Final Intro Screen of the Project:

Time's Up!
Time's UP! it is amazing how fast time passed, it is now September 25, the day I have to turn in the project. Here is a final Look at the current Build:


Also you can check out a small walk-through of the engine on this video.


Also you can check out a small walk-through of the engine on this video.
Flag Pole
The latest addition to the project is one that has nothing to do with AI, but like the last couple of additions, this one enhances the environment and gives the user a more familiar look. And that is the well known Starting line Flag, every racing game has this, actually every real race has this, therefore it was important for me to add this to the project.

The cool thing about the flag is that I made sure that I wouldn't add more work for an artist that was creating a level, therefore I designed an algorithm that would look at the track and analyze it in a way that it could place the flag correctly.
Mainly it uses the starting point and the first checkpoint for reference.
Sky Box
Today I decided to give the project a more complete look, therefore I added a sky box around the track.
Unfortunately my first try wasn't too good, I was able to show a sky box, but the problem was that you could clearly see the edges of the box, and this looks really bad!
Here is a screenshot:

After many iterations and a good amount of creativity, I was able to fix this problem with a very clever texture for the box.
Here is the same corner as before but with the new texture:

The way I solved the problem was by making a texture where all the noise and clouds and dirt show only in the middle of the side, then at the corners of the images it turns into the same color. this way on the edges you wont notice the change.

Blending Circle
Today I was viewing the current track and I noticed that it looked too rough, because it is made out of pixels it was looking too pixelated. To solve this problems, I had a couple of solutions, one was trying to make a pixel shader that could help me blend the pixels smoother, the next idea was inserting new verts so that the program would blend it better, and the last idea, that was given to me by my teacher Matt Norris, was to blend the pixels myself when I was exporting the image, that is when I came up with the idea of the blending circle:

Basically the idea is that every pixel is going to be affected by the pixels around it, but the blending needs to happen in an uneven way, because a pixel that is far from the current pixel shouldn't affect the color the same as the main pixel, in other words, the further the pixel, the less it affects the final color, so as you can see on the chart above, there are three sections that affect the final color.
Below you can see a screenshot of the before and after, as you can see the second image looks a lot smoother, it is not perfect, but coming from a 200x200 image, it looks pretty nice.

Version 0.5!
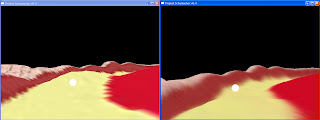
Today I officially ended version 0.5, unfortunately I didn't work for two weeks on the project, I spent most of my time working on other projects, but now I'm back in business, this version has accurate AI calculations and revamped Terrain, I worked quite some time on the rendering of a new level, this is the first level, an apple level!

Some of the mayor updates of this version:
-------------------------------------------------
Updated Track Following algorithm
Checkpoints inserted for respawn points
New Track
Improved Exporting of the track with a new Blending Factor Algorithm
Gravity affects the car when it passes a mountain
Starting Goal Point.
Here is a screenshot of the program right now:
On the left you can see a debug mode where all the information is displayed, and on the right is the final user version.

Ramster
.JPG)
Like I mentioned before, the first step before continuing the project was to determine what the game is like. The reason for this is that there are many different types of racing games, like F1, Need For Speed, Mario kart and many others, therefore in order to develop an effective AI, I need to know all the rules so that my computer adapts to it.
Ramster is the name of the game, it comes from "Racing Hamsters", As you might have guessed, the idea is to have hamsters race around different tracks, they will not be just running around, they will be inside bubbles. I will be posting the Game Design Doc soon.
This is the first view of what the Hamsters look like, This drawing was made By Hernando Bahamon

3D Vector Circle AI version 1
Today I was able to make the vector circle work on the 3D world, There are many different things I need to look at and improve, the most important ones are:
1) Make The car Steer instead of making it point to a different direction.
2) Make the car slow down when taking curves
3) Add direction nodes to ensure the car will follow the track correctly
4) Make reset points where the car will appear if it goes out of track.
here is a small video about it. Keep in mind this is a track that I created in under 5 minutes, this is a good example of the ease of use of the program:
Let The Games Begin!
The next part on the development process is a very interesting one, during the next week or two I will be playing many different racing games and I will try to analyze them to learn from past, I will try to notice the Good and the Bad choices that were made in order to reach a realistic and effective AI for the Game.
These are some of the things I want to look for while I am playing....
1) How do they Handle Out of bounds of the Car?
2) How do they make Players that are behind catch up to the leader?
3) What is the AI personality? do they try to follow the track, be an obstacle.....
4) Any powerups?
5) How do collisions work between cars?
3D Vector Circle
Here is a look at the vector circle Idea being rendered in 3D, now I can start testing the AI that worked with flash and see if it works on 3D.

Below you can see the Vector Circle Colliding with the outside of the track....


Below you can see the Vector Circle Colliding with the outside of the track....

First Look!
Finally after a lot of trouble with the textures I decided to restart the program with an other code base and it worked!
Now you can see how the program looks for the first time, with a car on a track!
Now you can see how the program looks for the first time, with a car on a track!
Moving On...
It's time for the fun part to start, from this point on, most of what I am going to be working on will be the AI of the player, therefore I need to revisit my previous tests and integrate them with the game. The most important aspect right now is the collision detection, so I will be checking that because it probably the most important element in the AI.
Bump on The Road!

Yes, I got the maps to have mountains and holes, but this is not exactly what I meant with the tittle "Bump on The Road!".
What I really mean is that I have hit a couple of road blocks on the production of the project. First is the mouse input, I can't get it to work correctly, I have spent several hours working on it but I keep getting crashes. Also I have had problems with loading textures for the Bitmap Font that I am creating, those two problems are taking some time off from the actual AI research and development.
But the bright side is that I am going to have to research these problems and I will practice the very important skill of solving problems by myself, and also I will make sure to truly learn these important skills.
Grid Program using XML
I have finally got the program to work with XML, now I don't have to recompile the program every time I want to create a track, I just run the flash software and get the xml code I can paste into the track xml file.
Here is a video showing how it works.....
Here is a video showing how it works.....
Pixel Grid Testing
I have made several improvements to the Pixel grid, as you might have notice on the previous test, there where two visual errors on the final grid,
1)Different colors where showing up on the final grid.
-The reason this was happening was that on openGL you call a function called glColor3f(float Red, float Green, float Blue);
and the problem was that the array generated by my flash program returns values from 0-255.
The function above takes floats, but it ranges from 0-1.0f, therefore my colors where messed up because they where almost always above 1, so to fix it I divided each color I get by 255.
2) the second problem was some weird holes, those holes where being caused by the outline of the track..
here is the latest screenshot...
Pixel Grid Test 1
I have now tested the pixel grid, I created an image using Flash and I ran the Image-To-Array converter that I created, then I pasted the created Array into the program and ran the Game, I was pretty happy when I got the results.. here is the first screen shot.

As cool as this is, there are still some things I need to test for, For example when I first started testing I started with an image size 200x200 and the c++ game completely froze, so I need to see if I can fix that.
also the colors are a bit different, I need to check how to solve that.
and finally there are some weird holes showing up around the track, I need to make sure that they don't appear on future maps.
Goals and Checkpoints
I have created a list of tasks and goals that will help me stay on track of what I should be working on, I did some predictions on the time it is going to take me to do different tasks.

From Today I have around 40 days to complete this project, therefore I should be able to complete it in theory by working an average of 3 hours per day, But there are a lot of extra feautures that I want to implement, therefore I will be working hard to finish this schedule as soon as possible.

From Today I have around 40 days to complete this project, therefore I should be able to complete it in theory by working an average of 3 hours per day, But there are a lot of extra feautures that I want to implement, therefore I will be working hard to finish this schedule as soon as possible.
Pre-Production almost Done.
The Pre-Production is one of three Stages for virtually any entertainment product.
During this stage is where all the research is done as well as all the planning. At this point I have done quite some reaserch on different algorithms, I have sat down and thought for many hours on how I could make something creative and Innovative, and I even created a program that will assist me during the production stage. But there is still a very important part left, The planning! Now I feel that my best choice is to sit down and break down all the tasks I am shooting for and also try to evaluate these tasks to come up with a target date of completion.
Here is a quick list of some required tasks and some Wishful tasks that are not a priority:

I will keep working on this task list and I should have one ready during the next 36 hours.
Subscribe to:
Posts (Atom)