Showing posts with label Project SW-Trench Attack. Show all posts

Star Wars Trench Attack

Star Wars Trench attack is a two week project to show off rendering skills in Open GL.

Project Start: May 12 2009 -- End: May 30 2009


Version 1.0


Today I finished the project, it has sound, menus, and all the rendering techniques I wanted to include, it was a great project, and I must thank all my friends and teachers who helped me or supported me during this month. I hope you like the process.
here is a final screenshot of the project and a document for it.


Project Document

3D Collision Detection

NICEEEEEEE, today I got 3D collision detection working, it might not sound like much, but it was pretty hard to actually calculate it. For testing I had to create spheres that would tell me where the bullets would be heading, and also a sphere of the ship, that way I could easily see when the bullets should collide.


---------------------------------------------


When you hit the ship it turns red and shakes a bit, it also produces a sound

Sorry, I had to add this!

I know it might sound really silly, but as a star wars honor, I had to include this small intro in my project.

Visual Changes

Today I added several Visual Changes to the project, mainly I worked on stars being rendered in the background and bullets.

The bullets are actually laser shots, therefore I needed to create a laser effect, in order to do this I rendered two cylinders on top of each other, but the second one has a greater radius and an alpha value. This way I scale it up and down constantly to create an electricity effect.

With this skybox it made the scene look like you are in space, this is a black and white image of a lot of dots.

Shaders

The ship model has no textures, so in order to make it look realistic I used a Pixel Shader to give texture.
The Pixel Shader is also really important for the rendering of the light. If you look at the scene light is coming from the left side. But because this ship has long wings, light should not hit the left side of the ship, so regular lighting equations are not valid, I had to do a custom shader so that it would lit the proper sides of the ship.

Here is a screenshot of version 0.7!

BIG UPDATE

Sorry for having all caps for the title, but like I said, this was A HUGE UPDATE, mainly lighting and shadows where added in.

I placed several lights around the level, the main one is located on the top left side of the level. This is the one that helps me simulate a “Sun” light.

Each wall and the floor has a different lighting effect, the left and bottom quads need to be much darker than the left one, so in order to do this effect I had to turn on different lights for different quads.

Obviously having all the different shadows meant that I needed to render a shadow for the ship in order to create a realistic environment. In order to create this shadow, I rendered the ship again, but this time I rendered in black and I scaled It by 0 on the x, this made it flat. Then I made the Y change according to the x position of the ship.


here is a screenshot with all of that!


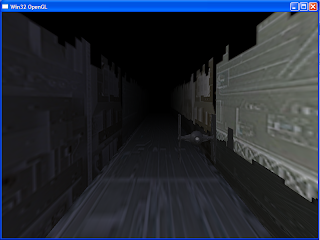
Another important effect that I added was the light that shines on top of the tie, this light only appears after the Tie crosses the shadow made by the left wall.
The last thing was making the world appear kind of bluish, and making sure the left wall clearly looked like it was lit.
I also tweaked the camera movement to prevent it from looking at weird angles.

Adding the Star Wars Ships

Loading 3D models into the program was an important feature on the project for me, I used a model that I found at www.jrbassett.com . And in order to render it on my project I used Deep Exploration 5.0. This created a CPP that I could use to load and render the model.


In this Version I Added a 3D model of A Tie-Fighter, this will be used during the level so that you can shoot at them.

--------------------------------------------------------


On this version I fixed the rendering of the 3D models so that they are facing the right direction, then I added a shadow to the bottom of the center ship.

I also fixed a small line that was rendering on the top of the walls.

Fixing the Rough Edges, FOG!!

Once I had the Quads, it looked too sharp at the end of the trench, therefore in order to prevent that I made a fog effect that would gradually make it darker. This removed the sharp corners.

Crazy Walls!

The Level contains three main Quads, one representing each side of the trench (walls and floor). The quads have a long depth; this makes it look really long. This way it makes it seem that you have a long way to go. There is also a small quad at the end to prevent anything that might be drawn behind it from showing.


There are two ways to make the trench, one, making a very long model and move it on the z position, or the other, making a texture and scrolling it. I chose to implement the second because it allows my level to last for an infinite amount of time.


Here are a couple of tests I made for the walls:


I mapped textures to the three rectangles. Then I made the texture coordinates move in order to simulate that the ship is moving forward.


------------------------------------------------------------------


On this version I modified the size of the trench to make it look more like the one on the movie, I added a different texture that makes it look more like the death star

Camera Control

Today I worked hard on the camera movement, the reason for this is that I wanted to make it look authentic, it was very important to recreate the type of movement a camera would have if it was inside of a ship. For this reason the camera rotates smoothly and doesn't turn exactly with user input, instead it acts like if real forces are making it turn over time.

First Working Version

After a couple of days of writing a simple program that can use Open GL and that has a small engine that can support all the effects I want to have, here is the first Screenshot of the program. For now it is simply 3 squares that don't do anything, but like I said, the engine is there to support lighting, texturing, input and camera control.

Task Analysis

To accomplish my goal of recreating this scene, there are several things I need to do, here is a brief list of them:

1)Walls moving
2)3D Models
3)Sunlight on the walls
4)Movement of the camera
5)Shooting bullets


I know there are many things that I am leaving out, but they will come with time, for now I will start with this list.

A new project

Today I Start a new project! The main Goal is to demonstrate my Open GL rendering Skills, and to do so I have chosen to recreate a classic Star Wars Scene, and this is The Death Star Attack on episode IV. here is a small clip of the scene: